
Update: LUKS2 is out, use it instead!
LUKS2 was released in 2018, you should double-check the documentation for it before you blindly follow this guide. 🙃
Introduction
Since TrueCrypt is no longer under active development, I’ve decided to wipe my external drives and re-encrypt them with LUKS and dm-crypt. These are standard Linux tools that are available by default in most distributions. I’ve used LUKS and dm-crypt in the past, when I installed Arch Linux on my laptop. Here, I’ll be performing a similar procedure, but without LVM.
Creating the encrypted drive
Step 1 - Identify your disk
Make sure you know which disk you’re working with by using lsblk.
sudo lsblk
Here, you can see the physical disk called /dev/sdb, which is my 1TB external drive. Do not assume that your drive will be /dev/sdb.
NAME                      MAJ:MIN RM   SIZE RO TYPE  MOUNTPOINT
sda                         8:0    0 298.1G  0 disk
├─sda1                      8:1    0  1007K  0 part
├─sda2                      8:2    0   128M  0 part  /boot
└─sda3                      8:3    0   298G  0 part
  └─VolGroup00            254:0    0   298G  0 crypt
    ├─VolGroup00-lvolswap 254:1    0     8G  0 lvm   [SWAP]
    ├─VolGroup00-lvolroot 254:2    0    25G  0 lvm   /
    └─VolGroup00-lvolhome 254:3    0   265G  0 lvm   /home
sdb                         8:16   0 931.5G  0 disk
Step 2 - Securely wipe your disk
You should always wipe your disk before doing anything. Unfortunately, depending on the size of the disk, this could take a long time. If your drive is already encrypted, you could simply wipe the header and your data would be safe. Since I’m paranoid, I always choose to nuke the entire drive. You could use badblocks to do a destructive write test (as I did here), or use dd, as shown below. If you’re using a SSD, your techniques will have to be a little different.
sudo dd if=/dev/zero of=/dev/sdb iflag=nocache oflag=direct bs=4096
Please don’t copy/paste this command directly, as you could risk destroying your current system. I’m not responsible for anything you break. 🤷♂️
Step 3 - Create partition
Start by creating a partition using fdisk.
sudo fdisk /dev/sdb
Use the n option to create a new partition, then press p for a primary partition. Press 1 to edit the first partition, then use the defaults for first and last sectors (this will fill up the entire drive). Finally, press w to write your changes.
Command (m for help): n
Partition type
   p   primary (0 primary, 0 extended, 4 free)
   e   extended (container for logical partitions)
Select (default p): p
Partition number (1-4, default 1): 1
First sector (2048-1953458175, default 2048):
Last sector, +sectors or +size{K,M,G,T,P} (2048-1953458175, default 1953458175):

Created a new partition 1 of type 'Linux' and of size 931.5 GiB.

Command (m for help): w
The partition table has been altered.
Calling ioctl() to re-read partition table.
Syncing disks.
Running lsblk again, we can see our new partition, /dev/sdb1.
NAME                      MAJ:MIN RM   SIZE RO TYPE  MOUNTPOINT
sda                         8:0    0 298.1G  0 disk
├─sda1                      8:1    0  1007K  0 part
├─sda2                      8:2    0   128M  0 part  /boot
└─sda3                      8:3    0   298G  0 part
  └─VolGroup00            254:0    0   298G  0 crypt
    ├─VolGroup00-lvolswap 254:1    0     8G  0 lvm   [SWAP]
    ├─VolGroup00-lvolroot 254:2    0    25G  0 lvm   /
    └─VolGroup00-lvolhome 254:3    0   265G  0 lvm   /home
sdb                         8:16   0 931.5G  0 disk
└─sdb1                      8:17   0 931.5G  0 part
Step 4 - Encrypt partition
Here, we’ll setup encryption on our new partition.
sudo cryptsetup -v -y -c aes-xts-plain64 -s 512 -h sha512 -i 5000 --use-random luksFormat /dev/sdb1
| Option | Description |
|---|---|
-v |
verbose |
-y |
verify passphrase, ask twice, and complain if they don’t match |
-c |
specify the cipher used |
-s |
specify the key size used |
-h |
specify the hash used |
-i |
number of milliseconds to spend passphrase processing (if using anything more than sha1, must be great than 1000) |
--use-random |
which random number generator to use |
luksFormat |
to initialize the partition and set a passphrase |
/dev/sdb1 |
the partition to encrypt |
Seriously, read the man page and the FAQ on cryptsetup before you do anything here.
To see the configuration of the header, use the command below.
sudo cryptsetup luksDump /dev/sdb1
Step 4.5 - Backup the LUKS header
The LUKS header stores metadata about the LUKS device, as well as the master key, key files, etc… Specifically, from the cryptsetup FAQ and specification:
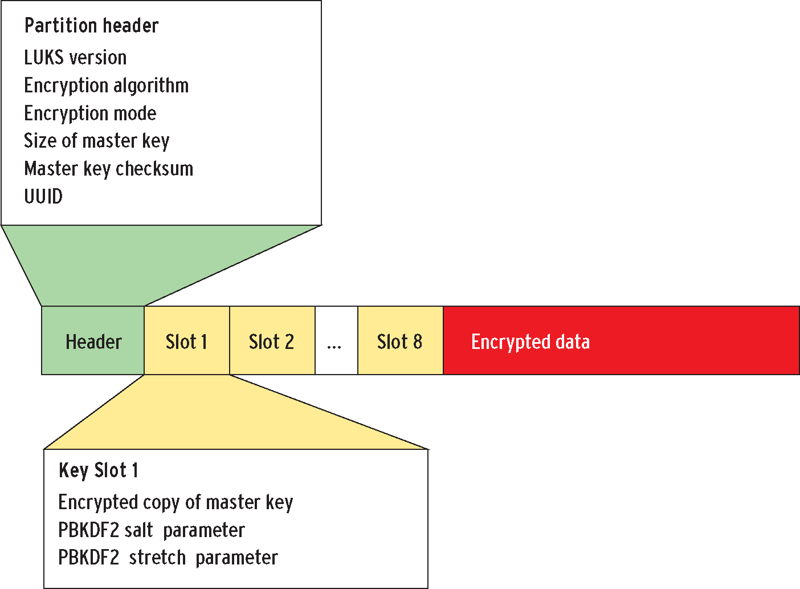
A LUKS partition starts with the LUKS partition header (phdr) and is followed by key material. After the key material, the bulk data is located, which is encrypted by the master key. The phdr contains information about the used cipher, cipher mode, the key length, a uuid and a master key checksum. Also, the phdr contains information about the key slots. Every key slot is associated with a key material section after the phdr. When a key slot is active, the key slot stores an encrypted copy of the master key in its key material section. This encrypted copy is locked by a user password. Supplying this user password unlocks the decryption for the key material, which stores the master key. The master key in turn unlocks the bulk data. For a key slot, all parameters how to decrypt its key material with a given user password are stored in the phdr (f.e. salt, iteration depth).
That paragraph is probably easier explained with an image.
If you don’t understand already, it’s important to not damage the LUKS header. It’s best practice to backup the header as soon as you create the LUKS device, because you’re probably lazy and won’t do it later. If you damage the header at all (accidental formatting, wrong device when using dd, bad block, etc…), you’ll need this backup header to recover the data. The header file itself needs encrypted and should be stored in safe place (not on the same drive, obviously).
sudo cryptsetup luksHeaderBackup --header-backup-file /path/to/file.img /dev/sdb1
Note - TrueCrypt (brilliant piece of software) uses a backup header at the end of the drive as well, to mitigate the risk of a single header.
Step 5 - Unlock the LUKS device
Open the LUKS container using the passphrase you just set. This will mount the device at /dev/mapper/volume01.
sudo cryptsetup luksOpen /dev/sdb1 volume01
Step 6 - Create filesystem
I’m going to be using ext4. Again, specify the name of device you set in the step above.
sudo mkfs.ext4 /dev/mapper/volume01
Step 7 - Mount device
Here, create a mount point, then mount the device to that location.
sudo mkdir -p /mnt/drive01
sudo mount /dev/mapper/volume01 /mnt/drive01
Step 8 - Unmount and close container
Now, unmount the drive and close the LUKS container.
sudo umount /mnt/drive01
sudo cryptsetup luksClose /dev/mapper/volume01
Mounting the encrypted drive
Every time you want to use this drive, you’ll need to open the LUKS container, mount the drive, do your work, unmount the drive, then close the LUKS container. You can do this manually, or a file manager to auto-mount it.
Manual
Below are the steps to manually unlock and use the drive.
sudo cryptsetup luksOpen /dev/sdb1 volume01
sudo mount /dev/mapper/volume01 /mnt/drive01
##DO YOUR WORK HERE##
sudo umount /mnt/drive01
sudo cryptsetup luksClose /dev/mapper/volume01
Automatic
Modern file managers like Thunar and Nautilus have support for unlocking and mounting LUKS devices automatically. The only downside to this setup is that you can’t use keyfiles in addition to passphrases.
Install and configure Thunar
If you don’t have Thunar, you’ll need it, along with a couple other packages.
sudo pacman -S thunar thunar-volman gvfs gvfs-afc
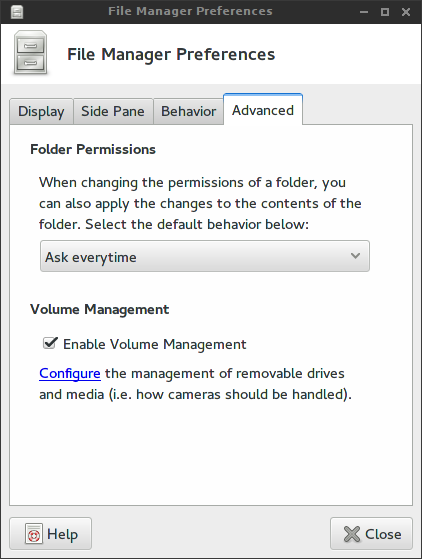
Open Thunar and navigate to Edit–>Preferences–>Advanced and ensure that Enable Volume Management is checked.
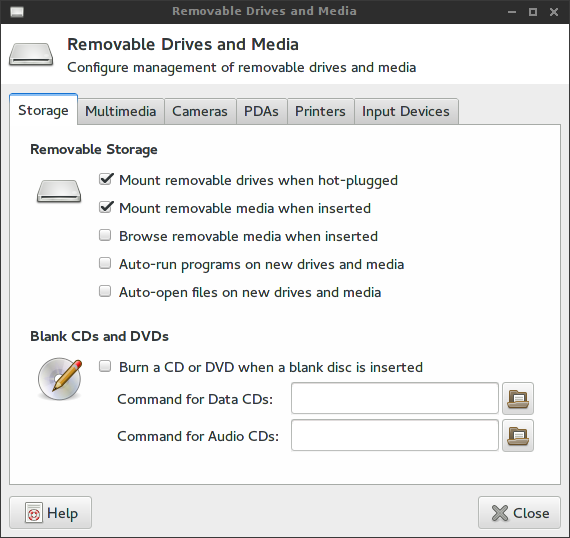
Click on Configure, and ensure that Mount removable drives when hot-plugged and Mount removable media when inserted are both checked. Click on Close to save your changes.
Mount drive
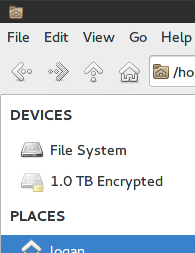
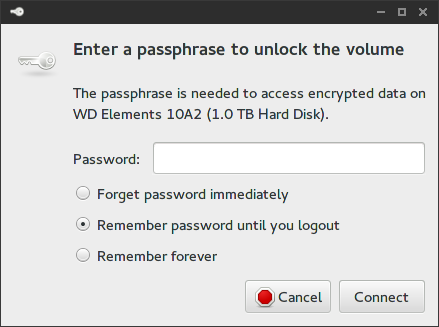
Plug in your external drive and open Thunar. In the top-left, you should see your drive under DEVICES.
When you click on the drive, you’ll be prompted for the passphrase you set earlier.
To unmount the drive, right-click on it and select Unmount.
-Logan
