Introduction
Recently, I’ve been thinking more and more about backups for my small (but growing) homelab. The golden rule is to follow the 3-2-1 method for backups:
- 3 backups
- 2 different types of media
- 1 backup offsite
Current setup
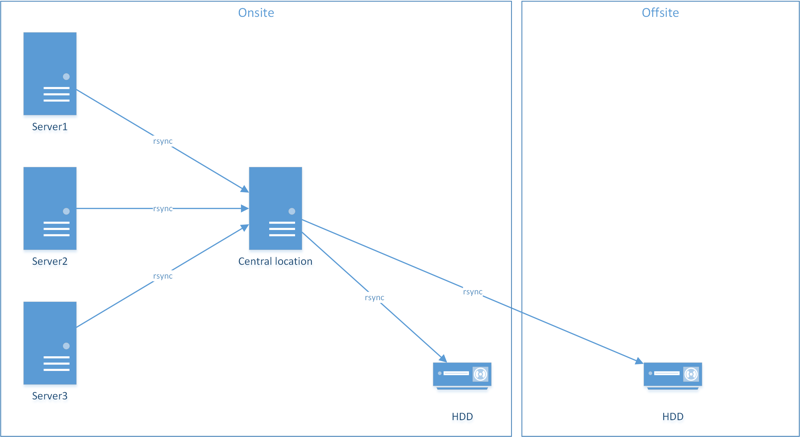
Currently, I keep an encrypted external HDD at home and another at work. Every couple weeks, I perform a backup to both and rotate the drives (this covers a 2-1-1 backup).
Planned setup
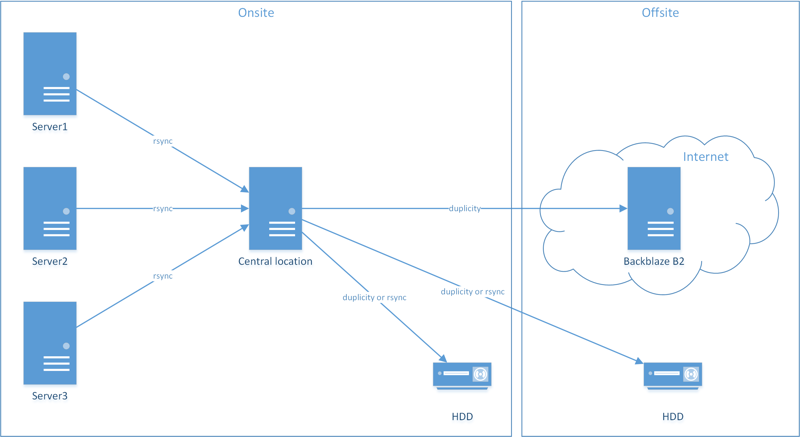
I’d like to add cloud storage for a full 3-2-1 backup. My idea is to centralize all my backups to one location, then send the backups offsite to a cloud storage provider. The setup below is my final goal and will fulfill my 3-2-1 requirement.
Storage providers
For this, I was looking for a raw storage endpoint with some sort of API or command line interface. I was not interested in a file syncing service (e.g., Google Drive or Dropbox) or a cloud backup solution (e.g., Crashplan or Carbonite). While looking for cloud storage providers, I compared the following:
I ended up choosing Backblaze B2 storage. They seemed to be the cheapest, had the most straight-forward pricing, and were the easiest to setup with the backup program I was using.
Full disclosure, I was already a Backblaze fanboy. I was already subscribed to their great blog where they post yearly stats on their hard drives. But, if that’s not enough, they offer free restores via USB flash drive or external HDD if your data is too big to download. And if you need to upload up to 40TB of data, you can request a Fireball (not free, but still cool).
Backup programs
While looking for backup programs, I compared the following:
I ended up choosing Duplicity. It seemed to be the most popular program, it supports incremental backups and B2 storage, and supports encryption with GPG.
Setup B2
Sign up and install B2
Sign up for a B2 account if you don’t have one already. You can download the official B2 command line tool from these instructions, but I’m installing the package from the AUR using pacaur. Note - You can create a bucket from the website if you don’t want to install the B2 command line tool.
pacaur -S backblaze-b2
Setup a bucket
Start by authorizing your account (substitute your account ID as needed). You will be prompted for your Application Key, which you can get in the B2 control panel.
backblaze-b2 authorize_account xxxxxxxxxxx
Now, create a bucket (make sure it is allPrivate). The bucket name must be globally unique to all of Backblaze, not just your account. You can have up to 100 buckets per account.
backblaze-b2 create_bucket server-backups allPrivate
Finally, list your available buckets.
backblaze-b2 list_buckets
Setup GPG
I highly recommend you encrypt your backups using GPG. It’s integrated into Duplicity and will protect your files from prying eyes. I won’t be covering it here, but check out my other guide on how to create a GPG key. For this setup, I will be using a separate key for encryption and signing.
Disclaimer - Don’t lose the keys or the passphrases to the keys. For example, don’t backup the GPG keys using Duplicity, then have your hard drive crash, which would require the GPG keys to unlock Duplicity. Store the keys on a separate backup by themselves.
Setup Duplicity
First, install Duplicity.
sudo pacman -S duplicity
Duplicity basics
The basic syntax for Duplicity is below.
duplicity [SOURCE] [DESTINATION]
To backup directly to a server via SFTP, use a command similar to the one below.
duplicity ~/backups sftp://username@server/directory/
To backup a folder to your B2 bucket, use a command similar to the one below. Substitute your account ID, application key, and bucket name as needed.
duplicity ~/backups b2://[account_id]:[application_key]@[bucket_name]/[directory]
Duplicity also handles rotating backups. Here, I’m remove backups older than 3 months.
duplicity remove-older-than 3M b2://[account_id]:[application_key]@[bucket_name]/[directory]
Duplicity script
Because Duplicity has so many command line options, it’s easier to setup a script and run it via cron.
#!/bin/sh

# Backblaze B2 configuration variables
B2_ACCOUNT="AAA"
B2_KEY="BBB"
B2_BUCKET="CCC"
B2_DIR="backups"

# Local directory to backup
LOCAL_DIR="/home/DDD/backups"

# GPG key (last 8 characters)
ENC_KEY="EEEEEEEE"
SGN_KEY="FFFFFFFF"
export PASSPHRASE="GGGGGGGGGGGGGGGGGGGGGGGGGGGGGGGGGGGGGGGGGGGGGGGG"
export SIGN_PASSPHRASE="HHHHHHHHHHHHHHHHHHHHHHHHHHHHHHHHHHHHHHHHHHHHHHHH"

# Remove files older than 90 days
duplicity \
 --sign-key $SGN_KEY --encrypt-key $ENC_KEY \
 remove-older-than 90D --force \
 b2://${B2_ACCOUNT}:${B2_KEY}@${B2_BUCKET}/${B2_DIR}

# Perform the backup, make a full backup if it's been over 30 days
duplicity \
 --sign-key $SGN_KEY --encrypt-key $ENC_KEY \
 --full-if-older-than 30D \
 ${LOCAL_DIR} b2://${B2_ACCOUNT}:${B2_KEY}@${B2_BUCKET}/${B2_DIR}

# Cleanup failures
duplicity \
 cleanup --force \
 --sign-key $SGN_KEY --encrypt-key $ENC_KEY \
 b2://${B2_ACCOUNT}:${B2_KEY}@${B2_BUCKET}/${B2_DIR}

# Show collection-status
duplicity collection-status \
 --sign-key $SGN_KEY --encrypt-key $ENC_KEY \
  b2://${B2_ACCOUNT}:${B2_KEY}@${B2_BUCKET}/${B2_DIR}

# Unset variables
unset B2_ACCOUNT
unset B2_KEY
unset B2_BUCKET
unset B2_DIR
unset LOCAL_DIR
unset ENC_KEY
unset SGN_KEY
unset PASSPHRASE
unset SIGN_PASSPHRASE
Hope this helps!
-Logan
