
Introduction
I’ve been doing some work on my homelab that I haven’t documented here.
I recently decommissioned my Raspberry Pi 3 that was running my Unifi controller, Dokuwiki, and Network UPS Tools (NUT). I replaced the RPi3 with an Intel i3 NUC with 12GB RAM and a Crucial 2.5" SSD. I chose to use Proxmox as the hypervisor on the NUC because it is open source, has a well-proven record, and has a low learning curve. At the time of this writing, I’m running five KVM virtual machines:
- mgmt01 - Jump server and Ansible master
- unifi01 - Unifi controller
- nginx01 - LEMP stack, running Dokuwiki and NUT
- vpn01 - Pritunl
- log01 - Graylog
However, the one thing I’m missing is a backup server.
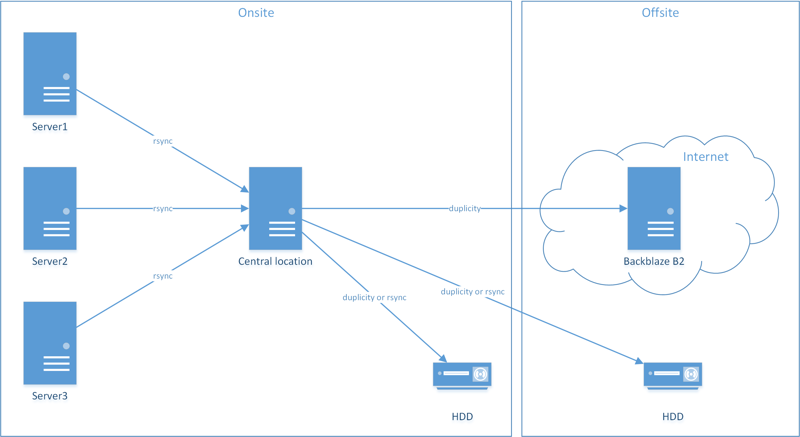
3-2-1 backup
The golden rule is to follow the 3-2-1 method for backups:
- 3 backups
- 2 different types of media
- 1 backup offsite
Currently, I’m following the 3-2-1 backup method, except the central location is my desktop PC. This is both inconvenient and a waste of space on my desktop. Ideally, I’d like have all the backups go to a NAS-type device, and have that device push the backups to a cloud provider (I already use Backblaze B2).
Devices
I looked at quite a few options, from single-board devices to full NAS devices, but ruled most of them out.
| Software | Advantage | Disadvantage |
|---|---|---|
| Raspberry Pi 3 Model B+ |
|
|
| Any Raspberry Pi clone (e.g., BananaPi, OrangePi, NanoPi, etc…) |
|
|
| Any x86 single-board device (e.g., Udoo, UP board, Minnowboard, etc…) |
|
|
| ODROID C2 |
|
|
| ODROID XU4 |
|
|
| ESPRESSObin |
|
|
| Helios4 |
|
|
| GnuBee PC2 |
|
|
| An actual 2-bay NAS (e.g., Synology, QNAP, etc…) |
|
|
In the end, I decided on the ODROID-HC2. The HC2 is the larger version of the HC1 (the HC1 holds 2.5" drives, while the HC2 holds 3.5" drives).
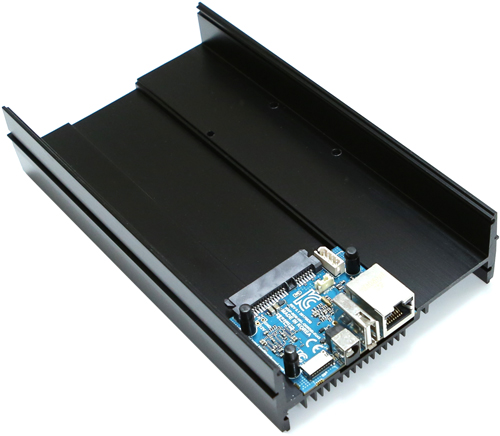
Both the HC2 and HC1 are based on the XU4, but lack the XU4’s HDMI port, USB 3.0 ports, eMMC slot, and GPIO connectors. The HC2 features:
- Samsung Exynos 5422 eight-core CPU
- 2GB DDR3 RAM
- USB3.0-based SATA3 port
- Gigabit ethernet (Realtek chipset)
- USB2.0 port
- MicroSD slot
- UART for serial console
- Stackable aluminum frame that acts as a heatsink and drive cage
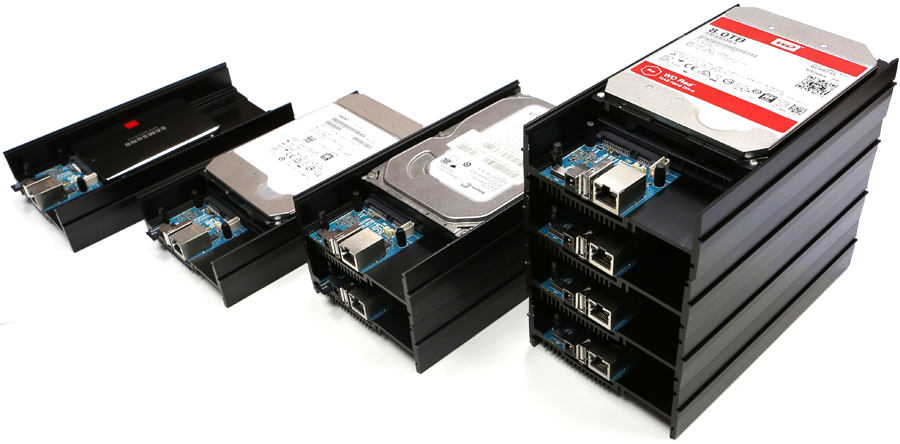
I purchased the HC2 from ameriDroid, along with a power cable and clear top cover. I also picked up a WD Red 4TB 5400 RPM hard drive. The Red drives are WD’s NAS drives, and the 5400 RPM speed will keep the unit quiet.
I chose the HC2, which is only a single-drive device, because I’m not looking for a 2-bay NAS with RAID support. The primary purpose of this device will be to backup all my other devices, then ship those backups offsite. If the drive dies, I’ll put a new drive in and the only thing I’ll have lost is old backups (locally, anyways).
Software
The HC2 has wide support for Linux, including an Ubuntu image from ODROID, Armbian, Arch Linux Arm, and OpenMediaVault. From these, I decided to go with OpenMediaVault (OMV). OMV is a NAS solution based on (at the time of this writing) Debian 9 (Stretch). It runs services like SSH, FTP, SFTP, SMB/CIFS, NFS, rsync and many more. It also features a nice web interface, S.M.A.R.T. monitoring, and a plugin system to enhance functionality (e.g., LDAP, iSCSI, etc…).
Currently, OMV3 is being retired, to be replaced with OMV4. However, OMV4 is still being tested for ARM boards. Because of this, you can install OMV4 one of three ways:
- Install Armbian first, then install OMV on top of Armbian
- Install OMV3, then upgrade to OMV4
- Install the current OMV4 test image
For this install, I chose to use the OMV4 test image.
Installation
The installation of OMV4 was pretty straight-forward, and there are plenty of guides for the XU4 that apply to the HC1 and HC2 (e.g., here, here, and here). You can also use any guide for OMV (e.g., here, here, and here) and take just the parts you need. I’m going to document what worked for me and what I enabled, but you can enable/disable whatever services you like.
Writing the MicroSD card
First, download the newest OMV4 image for the XU4/HC1/HC2 from here. You’ll need to extract the .img file from the .xz file, then pipe that through dd to write to your MicroSD card (I’m assuming you’re running Linux here).
sudo unxz OMV_4_Odroid_XU4_HC1_HC2.img.xz
sudo dd status=progress bs=4M if=OMV_4_Odroid_XU4_HC1_HC2.img of=/dev/sdX
sudo sync
First boot
When you boot the HC2 for the very first time, expect it to take 30 minutes or so. Since this server is headless (i.e., it has no graphics output), you won’t have the option to watch a screen to verify its state. Wait for the server to ping, then head to the web interface. By default, the web interface username/password is admin/openmediavault.
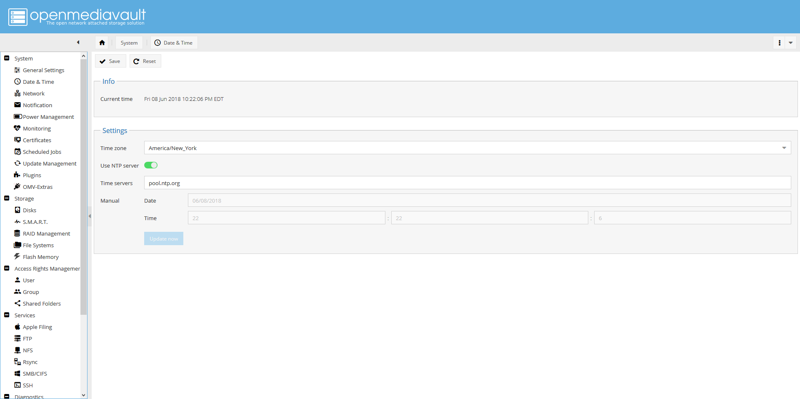
Date and time settings
Navigate to System, then Date & Time, set your timezone, and enable NTP.
Update packages
Navigate to System, then Update Management. Click Check at the top of the page to check for available updates.
Check the box next to each package, then click Upgrade at the top of the page to update the package(s).
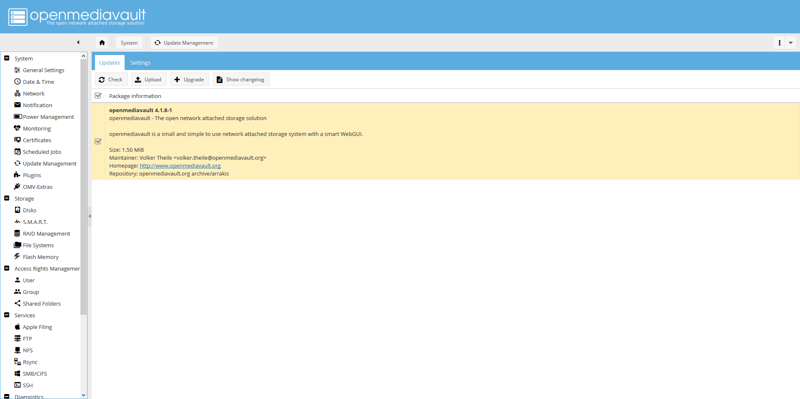
Once completed, reboot the HC2 from the menu at the top-right of the page.
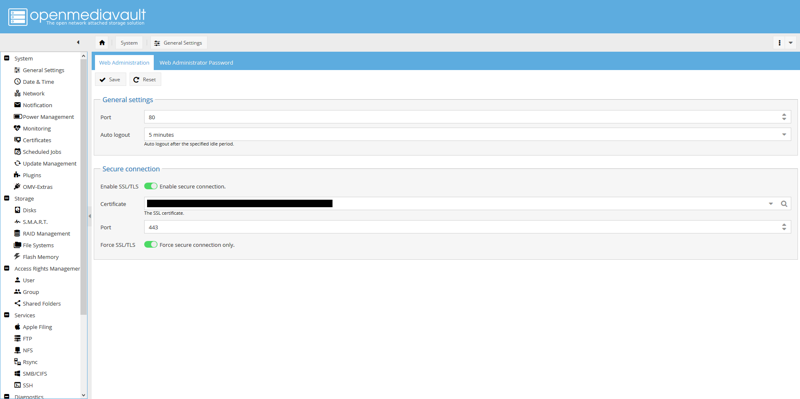
Enable HTTPS
Navigate to System, then Certificates, then select the SSL tab, click Add, then click Create. Fill in the information as necessary.
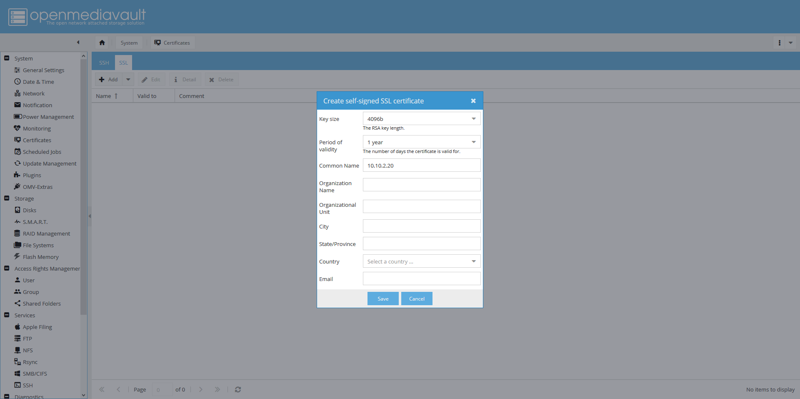
Navigate to System, then General Settings. In the Secure connection section, enable SSL/TLS and select the certificate you created. You will need to open a new tab using HTTPS instead of HTTP.
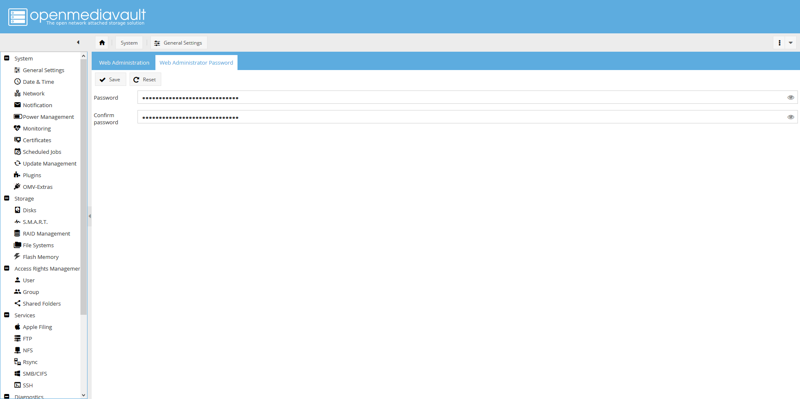
Change default web admin password
Navigate to System, then General Settings, then select the Web Administrator Password tab to update the password.
Enable SSH
I do most of my updating and management through Ansible, which requires SSH access.
Navigate to Services, then SSH, and enable the SSH service. Also, enable Permit root login.
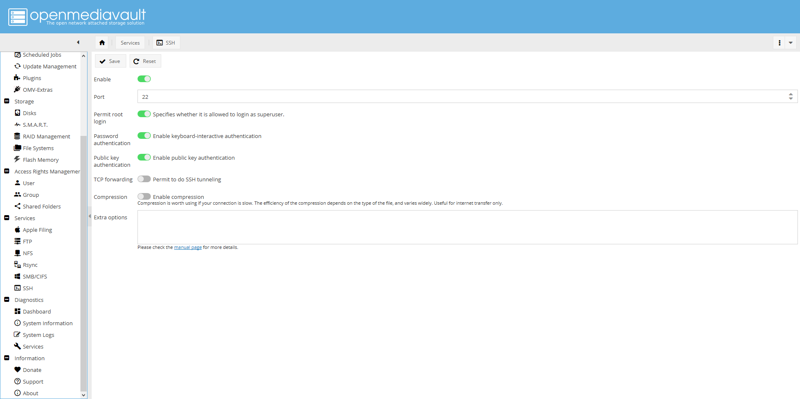
Change default root password
By default, the root username/password is root/openmediavault.
Now that SSH is enabled, you can SSH to the server as root. Upon login, you should be prompted to change root’s password
ssh root@IP_goes_here
Once you’ve changed the password, logout.
exit
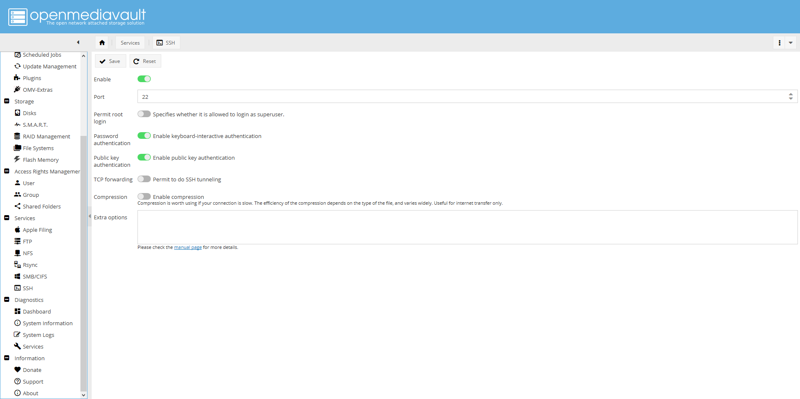
Disable SSH for root
Navigate to Services, then SSH, and disable Permit root login.
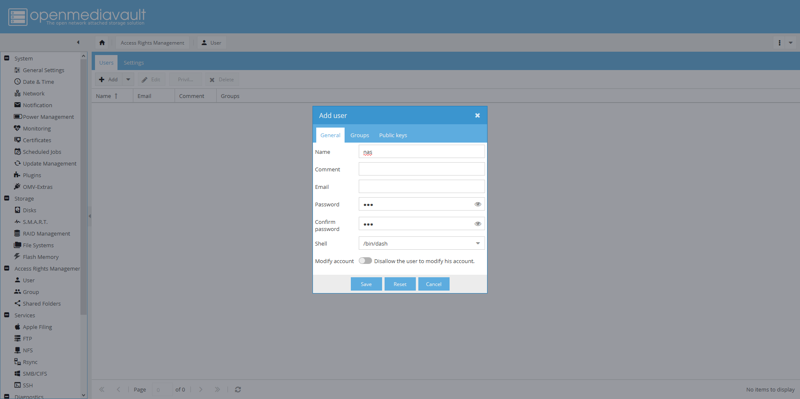
Add a secondary user
Navigate to Access Rights Management, then User. Click Add, name your user, and set a password.
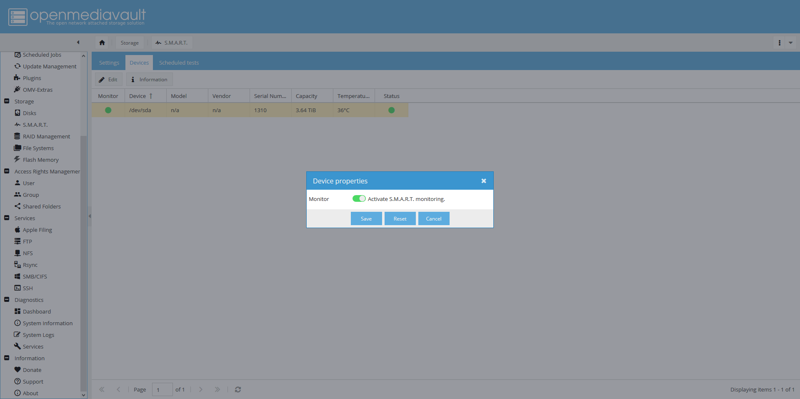
Enable S.M.A.R.T
Navigate to Storage, then S.M.A.R.T., then select the Settings tab, and enable S.M.A.R.T. monitoring.
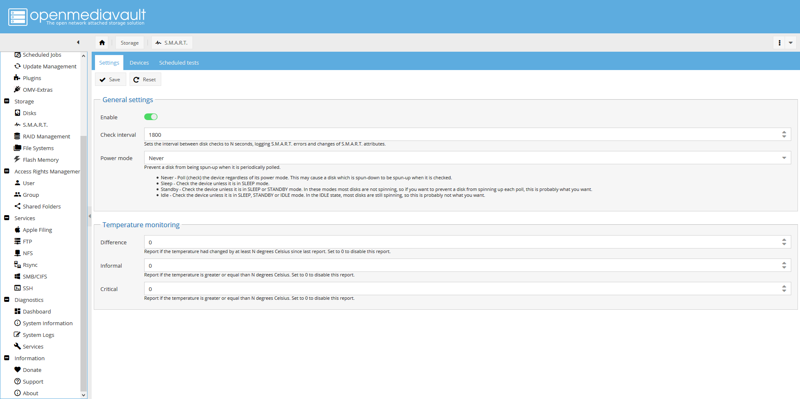
Navigate to the Devices tab, select your device and click Edit at the top of the page, then enable S.M.A.R.T. monitoring.
Drive setup
Physical setup
Navigate to Storage, then Disks. Select your hard drive (e.g., /dev/sda) and click Wipe at the top of the page.

Setup LVM - SKIP THIS STEP
I tried to setup LVM so that I could have one encrypted partition, and one unencrypted partition. I was able to get it working, however, every reboot would break the setup. Specifically, under Filesystems, the filesystem would be marked Missing after a reboot. Checking dmesg, I would see the drive was offline with the error Medium access timeout failure. Offlining disk!.
root@backup01:~# dmesg | grep sda
[ 14.588107] sd 0:0:0:0: [sda] 7814037168 512-byte logical blocks: (4.00 TB/3.64 TiB)
[ 14.588119] sd 0:0:0:0: [sda] 4096-byte physical blocks
[ 14.589011] sd 0:0:0:0: [sda] Write Protect is off
[ 14.589025] sd 0:0:0:0: [sda] Mode Sense: 53 00 00 08
[ 14.589455] sd 0:0:0:0: [sda] Disabling FUA
[ 14.589466] sd 0:0:0:0: [sda] Write cache: enabled, read cache: enabled, doesn't support DPO or FUA
[ 14.603406] sd 0:0:0:0: [sda] Attached SCSI disk
[ 14.868930] device-mapper: table: 254:0: adding target device sda caused an alignment inconsistency: physical_block_size=4096, logical_block_size=512, alignment_offset=0, start=33553920
[ 14.868939] device-mapper: table: 254:0: adding target device sda caused an alignment inconsistency: physical_block_size=4096, logical_block_size=512, alignment_offset=0, start=33553920
[ 14.870900] device-mapper: table: 254:1: adding target device sda caused an alignment inconsistency: physical_block_size=4096, logical_block_size=512, alignment_offset=0, start=2194476629504
[ 14.870908] device-mapper: table: 254:1: adding target device sda caused an alignment inconsistency: physical_block_size=4096, logical_block_size=512, alignment_offset=0, start=2194476629504
[ 30.572176] sd 0:0:0:0: [sda] tag#0 uas_eh_abort_handler 0 uas-tag 1 inflight: CMD IN
[ 30.572231] sd 0:0:0:0: [sda] tag#0 CDB: opcode=0x85 85 08 0e 00 00 00 01 00 00 00 00 00 00 40 ec 00
[ 45.597301] sd 0:0:0:0: [sda] tag#1 uas_eh_abort_handler 0 uas-tag 2 inflight: CMD IN
[ 45.597352] sd 0:0:0:0: [sda] tag#1 CDB: opcode=0x88 88 00 00 00 00 00 ff 78 7f 7f 00 00 00 08 00 00
[ 61.612177] sd 0:0:0:0: [sda] tag#1 uas_eh_abort_handler 0 uas-tag 2 inflight: CMD IN
[ 61.612228] sd 0:0:0:0: [sda] tag#1 CDB: opcode=0x85 85 08 0e 00 00 00 01 00 00 00 00 00 00 40 a1 00
[ 76.637308] sd 0:0:0:0: [sda] tag#0 uas_eh_abort_handler 0 uas-tag 1 inflight: CMD IN
[ 76.637361] sd 0:0:0:0: [sda] tag#0 CDB: opcode=0x88 88 00 00 00 00 00 ff 78 7f 7f 00 00 00 08 00 00
[ 76.786240] sd 0:0:0:0: [sda] tag#0 Medium access timeout failure. Offlining disk!
[ 76.786522] sd 0:0:0:0: [sda] killing request
[ 76.786690] sd 0:0:0:0: [sda] UNKNOWN(0x2003) Result: hostbyte=0x01 driverbyte=0x00
[ 76.786787] sd 0:0:0:0: [sda] CDB: opcode=0x88 88 00 00 00 00 00 ff 78 7f 7f 00 00 00 08 00 00
[ 76.786834] blk_update_request: I/O error, dev sda, sector 4286087039
[ 76.859645] blk_update_request: I/O error, dev sda, sector 0
[ 1462.638016] blk_update_request: I/O error, dev sda, sector 0
[ 1462.640632] blk_update_request: I/O error, dev sda, sector 0
[ 1462.655726] blk_update_request: I/O error, dev sda, sector 0
[ 1462.674249] blk_update_request: I/O error, dev sda, sector 0
[ 1462.678512] blk_update_request: I/O error, dev sda, sector 0
[ 1462.697718] blk_update_request: I/O error, dev sda, sector 0
[ 2675.814067] blk_update_request: I/O error, dev sda, sector 0
[ 2698.300818] blk_update_request: I/O error, dev sda, sector 0
I could verify this by checking the file below.
cat /sys/block/sda/device/state
The only way to bring the device back online was to echo running to that file. In fact, this is the official “fix” according to RedHat.
echo running > /sys/block/sda/device/state
Upon reboot, the device would go offline again. Because of this, I recommend skipping the LVM setup and moving straight onto creating one large filesystem.
Instead of having shares that are at a fixed size, I’m going to use Logical Volume Manager (LVM) to create smaller volumes that I can extend/shrink as needed. If you want to skip this setup, you can move on to Format and mount volumes.
Navigate to System, then Plugins. From the search box, search for lvm. Select openmediavault-lvm2 and click Install at the top of the page.
For LVM to work, we need to create three types of groups
a physical volumea volume groupone or more logical volumes
Navigate to Storage, then Logical Volume Management.
Navigate to the Physical volumes tab, click Add, and select your primary drive.
Navigate to the Volume groups tab, click Add, name your volume group, and select the physical volume you just created.
Navigate to the Logical volumes tab, click Add, name your logical volume, select the volume group you just created, and choose a partition size.
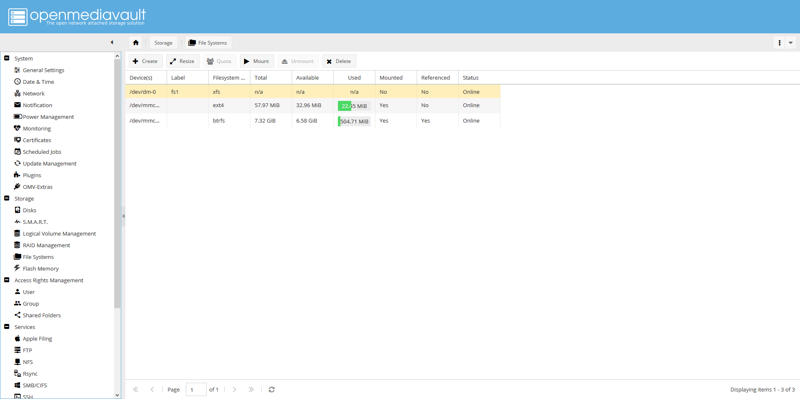
Format and mount volumes
Navigate to Storage, then File System, then click Create. Select the logical volume you just created, then choose a name and filesystem type (I’m using XFS).
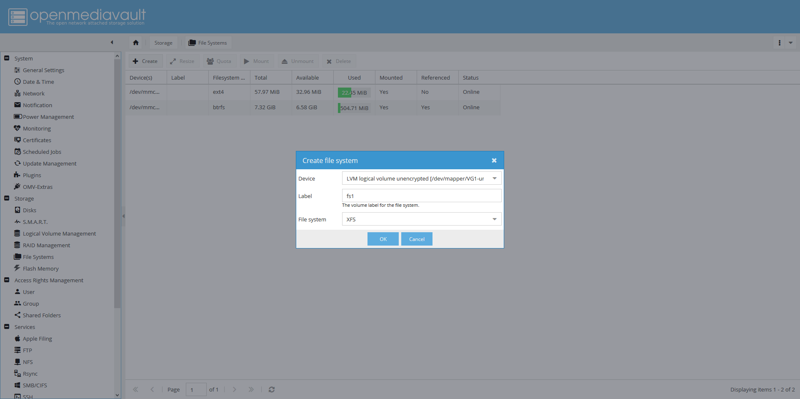
Once the filesystem is created, select your new filesystem and click Mount at the top of the page.
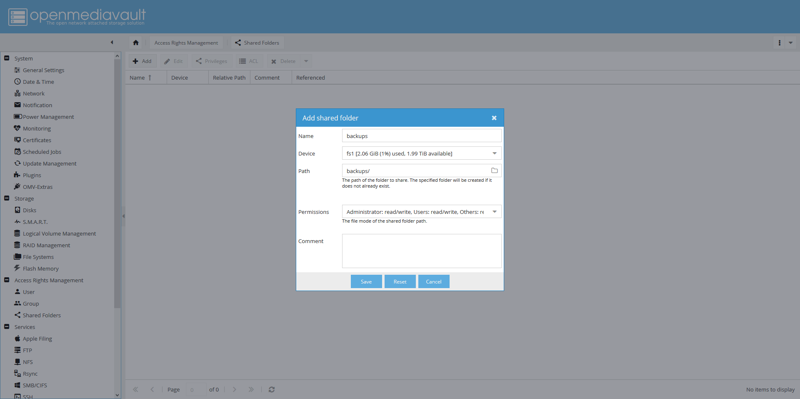
Create shared folder
Navigate to Access Rights Management, then Shared Folders. Click Add, name your folder, and select the filesystem we created earlier.
Enable SMB/CIFS
I have Windows, Linux, and Mac clients on my network. Because of this, I’m choosing to use Server Message Block (SMB) to share files.
Navigate to Services, then SMB/CIFS. On the Settings tab, enable the SMB service.

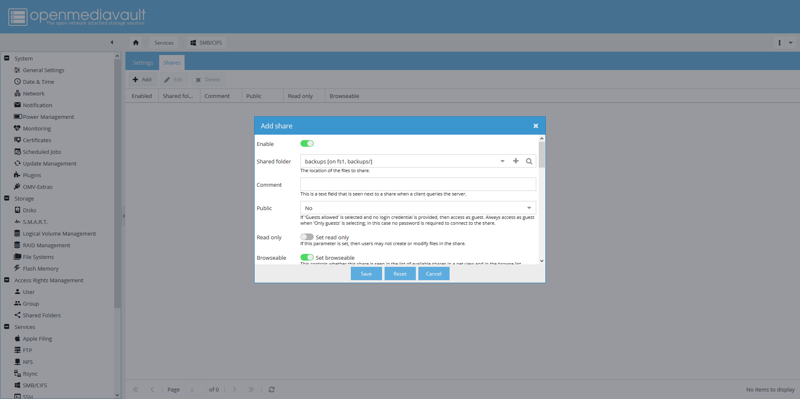
Navigate to the Shares tab, click Add, then enable the share and select the shared folder we created earlier.
Grant privileges
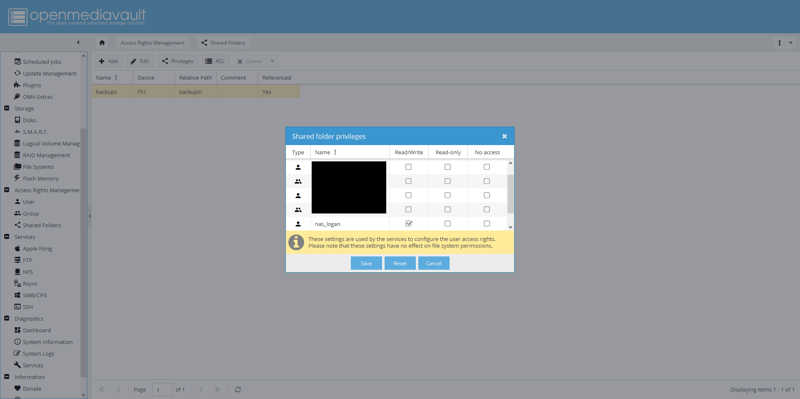
Navigate to Access Rights Management, then Shared Folders, select your shared folder, and click Privileges. Here, grant Read/Write privileges to the user you created earlier.
Client setup
I won’t cover how to setup every single type of client. In this case, Google “how to connect to smb from YOUR DEVICE HERE”.
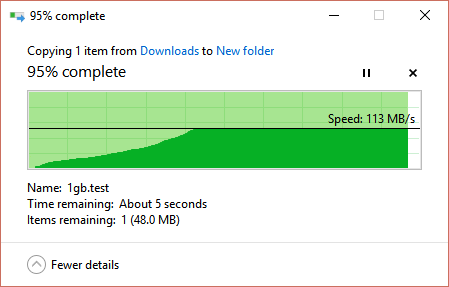
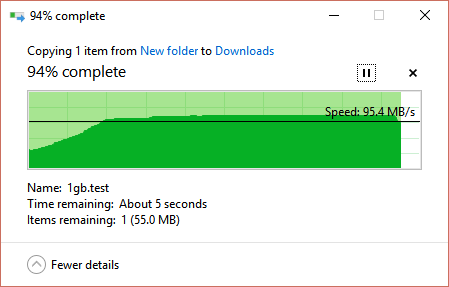
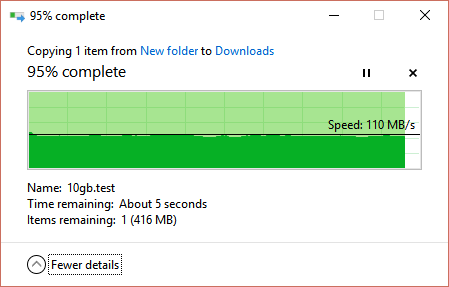
Performance
As you can see below, the performance is close to 1Gbps, which means the HC2 is able to almost saturate the network connection. Because of this, I don’t believe any of the tweaks suggested here or here apply. Specifically, the CPU governor is set to ondemand by default (shown in the command below) and since we’re using XFS, the NTFS tweaks don’t apply.
sudo grep GOVERNOR /etc/default/openmediavault
Write performance
Here, I’m copying a 1GB file from a Windows 10 laptop to OMV4 over wired ethernet.
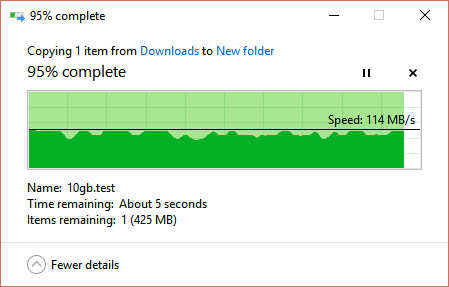
Here is the same test, but with a 10GB file.
Read performance
Here, I’m copying a 1GB file from a OMV4 to aWindows 10 laptop over wired ethernet.
Here is the same test, but with a 10GB file.
-Logan
